

How to Add External Knowledge to Dify
目次
This post explains how to connect external knowledge sources to Dify.
Background
We have a product that creates a vector DB from WordPress content
We have a product called WP RAG, which consists of a WordPress plugin and a backend API:
WP RAG – Build RAG Systems with WordPress Content
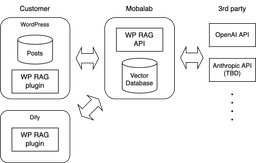
With WP RAG, WordPress site owners can easily create RAG systems / chatbots based on their WordPress posts. The following diagram shows the overall architecture:


Although WP RAG is a self-contained solution, there are many opportunities to leverage the contents and their embeddings stored in the vector database of WP RAG API.
Dify is a Swiss army knife for AI solutions
Dify offers you an easy way to build many different types of AI solutions without programming:
Dify: Leading Agentic AI Development Platform
It supports many LLMs, and also can connect to many external APIs, such as Google, Amazon Bedrock, GitHub, and Slack through plugins.
Goal
Dify has a concept called “Knowledge”. Think of it as similar to a NotebookLM project where you can upload documents. On Dify, you can create a Knowledge and upload documents to it. Alternatively, you can connect to an external data source and make it an external Knowledge.
Our goal is to integrate our WP RAG API vector database as external Knowledge in Dify so that users can create not only chatbots but also many different types of AI solutions based on the WordPress contents that they own (stored in our vector database).
Overview
Now that we’ve defined our goal, let’s examine the implementation approach.
I did a research on how I can achieve the goal, and found out that there are a few ways. I decided to go with the “Extension” plugin. I’ll write about why I chose it later.
In summary, Dify will connect to WP RAG API through the Extension plugin that I’ll develop, and use our vector DB as an external Knowledge.
The overall architecture with the plugin will look like the following:


How to develop and set up an extension plugin
With our approach decided, let’s dive into the technical implementation.
Initial setup
First, we need to deploy Dify locally by following the steps on the page below:
Deploy with Docker Compose – Dify Docs
Then, install the Dify CLI tools by following section 1 of the page below:
Install Development Tools – Dify Docs
Create and set up a plugin project
Run the following command:
dify plugin init
This will prompt you to enter plugin information as shown below:
Edit profile of the plugin
Plugin name (press Enter to next step): Plugin name, a directory will be created with this name
Author (press Enter to next step): Author name
Description (press Enter to next step): Description
Repository URL (Optional) (press Enter to next step): Repository URL (Optional)
Then, choose the language for development:
Select the language you want to use for plugin development, and press Enter to continue,
BTW, you need Python 3.12+ to develop the Plugin if you choose Python.
-> python
  go (not supported yet)
After that, choose the plugin type, which is “Extension” in our case:
Select the type of plugin you want to create, and press `Enter` to continue
Before starting, here's some basic knowledge about Plugin types in Dify:

- Tool: Tool Providers like Google Search, Stable Diffusion, etc. Used to perform specific tasks.
- Model: Model Providers like OpenAI, Anthropic, etc. Use their models to enhance AI capabilities.
- Endpoint: Similar to Service API in Dify and Ingress in Kubernetes. Extend HTTP services as endpoints with custom logic.
- Agent Strategy: Implement your own agent strategies like Function Calling, ReAct, ToT, CoT, etc.

Based on the ability you want to extend, Plugins are divided into four types: Tool, Model, Extension, and Agent Strategy.

- Tool: A tool provider that can also implement endpoints. For example, building a Discord Bot requires both Sending and Receiving Messages, so
- Model: Strictly for model providers, no other extensions allowed.
- Extension: For simple HTTP services that extend functionality.
- Agent Strategy: Implement custom agent logic with a focused approach.

We've provided templates to help you get started. Choose one of the options below:
  tool
  agent-strategy
  llm
  text-embedding
  rerank
  tts
  speech2text
  moderation
-> extension
As the final step, enable the necessary permissions. In our case, only “Endpoints” is necessary. You can change them later, so if you’re not sure which ones to enable, just guess:
Configure the permissions of the plugin, use up and down to navigate, tab to select, after selection, press enter to finish
Backwards Invocation:
Tools:
    Enabled: [✘]  You can invoke tools inside Dify if it's enabled
Models:
    Enabled: [✘]  You can invoke models inside Dify if it's enabled
    LLM: [✘]  You can invoke LLM models inside Dify if it's enabled
    Text Embedding: [✘]  You can invoke text embedding models inside Dify if it's enabled
    Rerank: [✘]  You can invoke rerank models inside Dify if it's enabled
    TTS: [✘]  You can invoke TTS models inside Dify if it's enabled
    Speech2Text: [✘]  You can invoke speech2text models inside Dify if it's enabled
    Moderation: [✘]  You can invoke moderation models inside Dify if it's enabled
Apps:
    Enabled: [✘]  Ability to invoke apps like BasicChat/ChatFlow/Agent/Workflow etc.
Resources:
Storage:
    Enabled: [✘]  Persistence storage for the plugin
    Size: N/A  The maximum size of the storage
Endpoints:
  → Enabled: [✔]  Ability to register endpoints
Oh, there’s one last step, but we can just hit “Enter” to skip it:
Edit minimal Dify version requirement, leave it blank by default
Minimal Dify version (press Enter to next step): Minimal Dify version
2025/06/25 00:38:28 init.go:470: [INFO]plugin foo created successfully, you can refer to `plugin-name/GUIDE.md` for more information about how to develop it
Some configuration in the plugin directory
It’s always a good idea to use a virtual environment. I did the following, but this may vary depending on your environment:
python3 -m venv .venv
source .venv/bin/activate
pip install -r requirements.txt
Also, we need to change .env . Go to the plugin page on Dify, then click on the bug icon (next to “Install plugin”). Copy and paste the URL (localhost:5003) and Key into the corresponding values in .env .

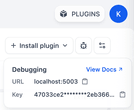
Note that the key regenerates every few hours or so, and you need to update .env with the new key.
Write code
Now, it’s time to write the code. You can check out the code in the following PR:
Minimal feature to connect to WP RAG API by k4200 · Pull Request #1 · mobalab/dify-wp-rag
I’ll explain the important parts later.
Install the plugin
Running the following command will install the plugin:
python -m main
Add a plugin endpoint
After a successful installation, a panel that looks like the following will be added to the plugin page:

Now, click on the panel, and then clicking on the “+” button next to “ENDPOINTS” will show you the following dialog:

Input the following information on the dialog, and click on “Save”:
- Endpoint Name: Arbitrary name
- Site ID on WP RAG: You can get this on the main page of WP RAG plugin.
- WP RAG API key: You can get this on the main page of WP RAG plugin.
After creating an endpoint, you’ll see the URL on the endpoint panel. Now, copy it:

Add an external Knowledge
On the “Knowledge” section of Dify, click on “External Knowledge API” on the top right, then click on “Add an External Knowledge API”:

On the dialog, enter the following info:
- Name: Arbitrary name
- API Endpoint: Remove
/retrievalpart from the copied URL in the previous step, and replace the host name withnginxe.g.http://nginx/e/y64nt432xlp5p0g1 - API Key: This is not used, so put any string.
After that, click on the “Connect to an External Knowledge Base” button inside the “Create Knowledge” panel:

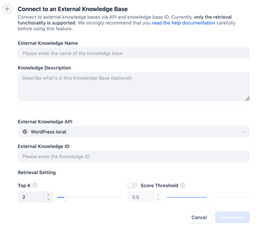
On the page, enter the following:
- External Knowledge Name: Arbitrary name
- Knowledge Description: This is optional, so leave it blank.
- External Knowledge API: Choose the one that you created in the previous step.
- External Knowledge ID: This isn’t used, so put any number here.
- Retrieval Setting: Leave them as-is for now.
Test
With the setup complete, we can now test our configuration.
Now you can use the external Knowledge in a Dify workflow, but before doing it, it’s better to test the external Knowledge only.
Retrieval Test
On the “Knowledge” section, clicking on the external Knowledge panel brings you to the “Retrieval Test” page. You can enter a query, click the “Test” button, and check the results. If you have any issues, check the log.
Create an App on Dify
Once you’re satisfied with the setup of the external Knowledge, it’s time to create an app. Go to the “Explore” section, and you’ll see many predefined apps. “Knowledge Retreival + Chatbot” would be a good starting point.
Open the app, select the “Knowledge Retrieval” step, then set the external Knowledge to “Knowledge”.


You’re all set.
Explanation about the code
endpoints/dify-wp-rag.py
These values are the ones that you entered in “Add a plugin endpoint”:
        site_id = settings.get("wp_rag_site_id")
        api_key = settings.get("wp_rag_api_key")
API endpoints must return results in a defined format:
        response = requests.get(url, params, headers=headers)
        results = []
        for record in response.json()['search_results']:
            result = {
                "metadata": {
                    "path": record['post']['url'],
                    "description": ''
                },
                "score": record['score'],
                "title": record['post']['title'],
                "content": record['post']['content']
            }
            results.append(result)

        return Response(json.dumps({"records": results}), status=200, content_type="application/json")
But, I couldn’t seem to find the document that describes it. In general, Dify’s documentation is insufficient.
endpoints/dify-wp-rag.yaml
In this file, you can define config values necessary to the plugin. type seems to be one of the followings according to the source code:
text-inputsecret-inputselectstringnumberfilefilesbooleanapp-selectormodel-selectorarray[tools]any
Misc.
This section discusses miscellaneous topics not covered in the previous sections.
Other options to implement this feature
I considered a couple of alternatives to the Extension plugin approach when I started to think about connecting Dify with WP RAG, and below are the ones:
I think I could create a RAG app on Dify that would connect to WP RAG API with either way, but the Extension plugin approach seems to give us more flexibility and a unified way to deal with external data sources. I won’t go deeper into them here. If you’re interested in the alternatives, please refer to the documentation linked above.
Error when the debugging key is wrong
In the “Some configuration in the plugin directory” section, I mentioned that the key regenerates every few hours. After it regenerates and the value in .env becomes invalid, you’ll see an error like the following:
{"event": "log", "data": {"level": "INFO", "message": "Installed endpoint: ['/retrieval']", "timestamp": 1750915812.187468}}
INFO:dify_plugin.plugin:Installed endpoint: ['/retrieval']
ERROR:dify_plugin.core.server.tcp.request_reader:An error occurred while parsing the data: b'handshake failed, invalid key'
Traceback (most recent call last):
  File "/path/to/dify-wp-rag/.venv/lib/python3.13/site-packages/dify_plugin/core/server/tcp/request_reader.p
y", line 192, in _read_stream
    data = TypeAdapter(dict[str, Any]).validate_json(line)
  File "/path/to/dify-wp-rag/.venv/lib/python3.13/site-packages/pydantic/type_adapter.py", line 468, in validate_json
    return self.validator.validate_json(
           ~~~~~~~~~~~~~~~~~~~~~~~~~~~~^                                                                                                               data,
        ^^^^^
    ...<4 lines>...
        by_name=by_name,
        ^^^^^^^^^^^^^^^^
    )
    ^
pydantic_core._pydantic_core.ValidationError: 1 validation error for dict[str,any]
  Invalid JSON: expected value at line 1 column 1 [type=json_invalid, input_value=b'handshake failed, invalid key', input_type=bytes]
    For further information visit https://errors.pydantic.dev/2.11/v/json_invalid
ERROR:dify_plugin.core.server.tcp.request_reader:Failed to read data from localhost:5003
Traceback (most recent call last):
  File "/path/to/dify-wp-rag/.venv/lib/python3.13/site-packages/dify_plugin/core/server/tcp/request_reader.p
y", line 169, in _read_stream
    raise Exception("Connection is closed")
Exception: Connection is closed
Useful resources for developing Extension plugins
When developing this plugin, dify-wp-rag, I referenced the following resources many times:
- An official doc: Connect External Knowledge – Dify Docs
- An official plugin similar to ours: llamacloud commit by ForeignKeyCN · Pull Request #495 · langgenius/dify-official-plugins
If you’re developing an Extension plugin, they will definitely help you.
Poor documentation
I mentioned useful resources in the previous section. However, the overall documentation is poor, or unorganized at best. For example, there’s a page about Extension plugin, but the sample code (neko) is a useless dummy plugin:
Also, as I mentioned earlier, there are no clear explanations on which plugin type to choose for certain scenarios.
Dify seems a bit buggy and hard to debug
While I developed the plugin, I encountered weird behaviors a few times. I didn’t look into them deeper, but some of them might have been bugs. An ex-coworker who uses Dify heavily at work also said it’s buggy.
Another thing is, Dify seems (at least to me) hard to debug. It’s a big program, and there should be more document pages dedicated to debugging and troubleshooting, but I couldn’t find any but the following:
Outputting Logs for Plugin Development and Debugging – Dify Docs
Conclusion
Dify allows you to create AI powered apps without coding, and can connect to external programs and services for complex workflows with plugin mechanism.
This tutorial demonstrated how to develop a Dify Extension plugin that can connect to external data sources as external Knowledge, how to test it, and some miscellaneous topics.
While Dify’s documentation could be more comprehensive, the Extension plugin approach offers the flexibility needed to integrate custom data sources effectively. This integration opens up possibilities for creating sophisticated AI applications that leverage your existing WordPress content.
If you have any questions etc., feel free to ask me via the channels shown below:
- The company’s inquiry form (It’s in Japanese, but you can use Google Translate etc.)
- DM to my X account
コメントを残す